Sent
Messages successfully sent through Merus will always be shown in the Sent tab, and your Merus sent items sync with the Sent folder on your non-Merus email client as well. So, if you send a message to [email protected] in your non-Merus email, your Merus sent folder will also show that sent item.
Pro-Tip
Only messages that were successfully sent to the receipient will be shown in the Sent tab; otherwise, they will show up in your Outbox tab.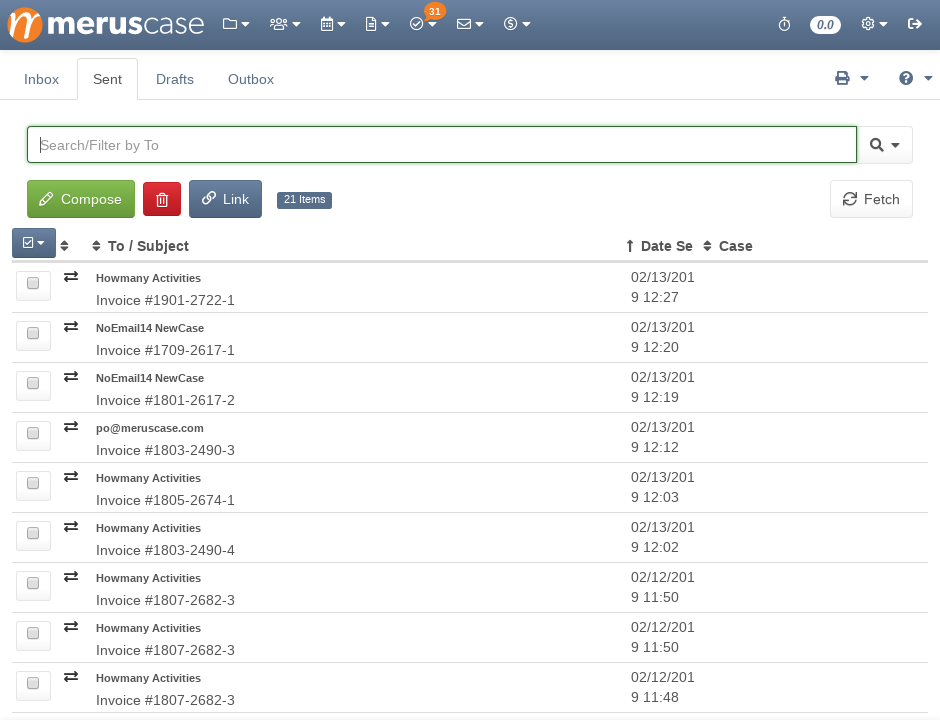
To open and read a sent message, simply click anywhere on the message from the Sent tab. This will cause the message to appear on the right side of the screen. On a mobile device, the message will be visible full-screen.
To close the message, simply click on the ‘X’ in the upper-left hand corner of the message. This will return you to the Sent tab.
Fetch Mail
The Fetch Mail button is available from the Sent tab so that you can easily syncronize your email account with MerusCase at your discretion. For additional information on the Fetch Mail button, see the Fetch Mail section of our Messaging - Inbox article.
To see how long it has been since a fetch has been run on your email accounts, click the dropdown menu to the right of the Fetch Mail button. This will show of history of mail fetches on your account.
Compose
The Sent tab contains a Compose button, which will allow you to compose a new message. For additional information on composing messages, see the documentation entitled Messaging - Compose.
Select Everything or Select None
To make it easy to perform tasks in bulk, MerusCase has a dropdown menu available which allows the user to select all of the items in the table or deselect all of the items in the table simultaneously. Simply click the checkbox-like icon above the column of checkboxes to see the options Select None and Select Everything.
Note that this will only apply to items in the table which you’ve currently filtered for (i.e. which are displayed on your screen at this moment).
Link to Case
Messages in the Sent tab can be easily linked to the appropriate case. Once a message has been linked to a case, then all messages in that email thread/chain will be linked to the same case. This applies both to previous emails and future emails in the thread.
Filter
Any table in MerusCase allows for filtering across any of the columns on your screen to provide the user a tailored list within the system. In other words, use the filter to quickly find a specific line item within the table.
Additionally, MerusCase supports the use of multiple filters at once. For instance, a user can search for all open (by the Case Status column) cases within Browse Cases and then apply a second filter to then search for Assigned to Me (by the Staff column) within those open cases.
To apply multiple filters, enter the first filter then click on the magnifying glass. On click, a drop-down window will appear. Click Add Filter and toggle what to filter by.
Select Always use this column if you wish to always use the same filter type. Many firms find it particularly useful to select this option when filtering for cases, forms, or templates.
Pro-Tip
MerusCase filtering has very powerful Search and Filter Tricks available to you, such as Custom Filter Shortcuts, powerful keywords, Preset Filters and even more!To remove a filter, click on the added filter button (each applied filter appears as a button underneath the Search/Filter bar). For example, to remove the filter for open cases, click on the button Status: Open underneath the Search/Filter bar.
The Search/Filter bar in the Sent tab can be used to filter the messages by Recipient, Subject, Date, and Case. To adjust which category to filter by, simply click on the magnifying glass to the right of the Search/Filter bar. You can then click on the Filter By dropdown menu to select another category.
Delete
Deleting emails from the Sent tab functions in the same way as deleting emails from the Inbox tab.