Case Details
After creating a new case, the user will be taken to the Case Details tab, which is set as the default tab for all users. This means that, each time a user enters a case, they will always view Case Details first.
Pro-Tip
The default tab can be set as Case Details, Activities, or Parties in My Preferences.The Case Details tab displays the basic contact information for the party who initiated the action as well as filing dates, court venue, billing parties, staff responsible, and much more.
Case Details is divided into four sections:
-
Case Progress: case timeline that works in tandem with Billing Rules.
-
Case Agenda: Events and Tasks related to the Case
-
Primary Contact Information
-
Case Info
Case Progress
If enabled, the Case Progress bar will appear on each case and show the progression of the case itself as well as the structure of its billing. It inherits its info from the Template an administrator setup for the case’s Case Type, it can be thoroughly customized for the specific case you’re working on.
Case Agenda: Events and Tasks
The Case Agenda lists all upcoming Case Events and Case Tasks that are related to the case. Completed tasks and events in the past will not be displayed on the Case Agenda.
Clicking through on an item within the Case Agenda will open up the details of that case task or event.
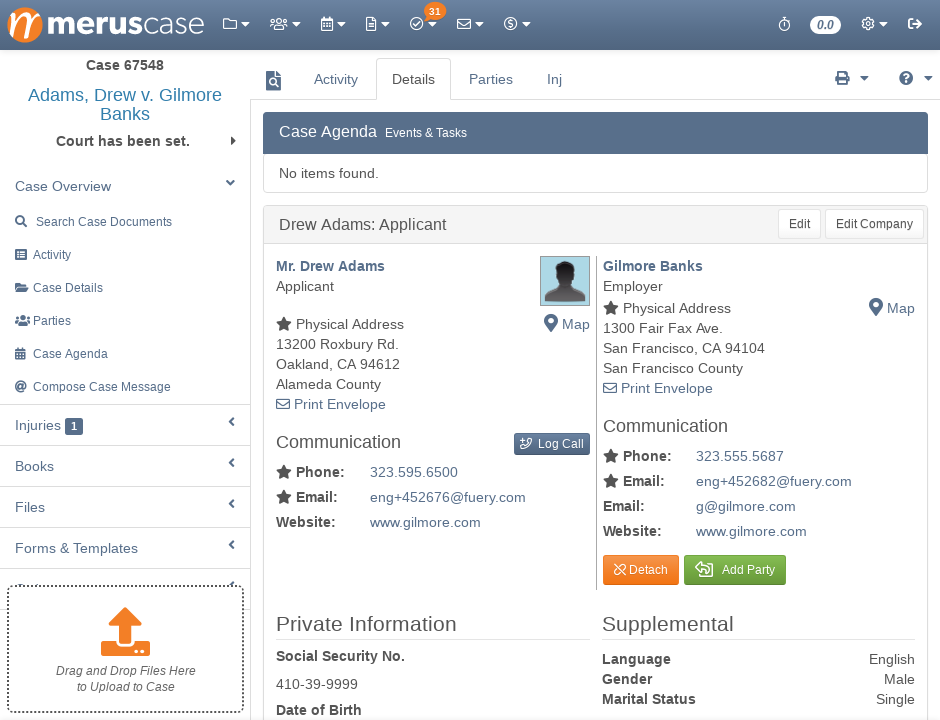
Primary Contact Information
This section displays the basic contact information of the party who initiated the action, such as the plaintiff, petitioner, claimant, beneficiary, etc. This means that, based on the type of law you practice, your client may not be the primary contact within Case Details.
The title of that initiated party is displayed based on the case type, meaning that, if the case type opened is Immigration, Beneficiary will be displayed, whereas a Workers’ Compensation case will display Applicant.
Pro-Tip
Changes made in this section will affect all cases on which the contact is a participant except for People Type and Party sections, such as Party Notes and Party Groups.Refer to Contacts for more information about how your firm’s rolodex affects the information displayed in this section, including multiple addresses, linking employees to companies, adding social media information, and more.
To make changes to the primary contact information section from the Case Details tab, click Edit.
Note
You can change which party on the case is displayed here.Case Info
Click Edit to update Case Info. Once all changes has been made, remember to click save!
-
Case Type: Refers to the type of case, such as Immigration, Personal Injury, or Civil. Selecting different case types will enable custom, case-specific tabs depending on the type of case.
-
Case Status: Refers to the status of the case, such as Open, Dismissed, or Consult-Only. Click on the drop-down menu to select from the available options. Historically, some MerusCase clients have requested special case statuses. To submit a request, send an email to MerusCase Support.
Note
If you change the status to archived, this case will only show up in Browse Cases under the Archived tab. You will not be able to link emails to it, create linked events, bill on it, etc. If you change the status to anything else, the case will no longer be archived. Use this feature to 'store away' a case file and prevent further changes.-
File Location: Refers to internal file locations where your firm stores all physical papers related to this case.
-
File Number: This is a firm-assigned number according to the method by which you organize your physical files. It is not a court number.
Pro-Tip
By default, MerusCase will assign a number incrementally. To have your firm's internal case number identifier displayed, update the Secondary Case Identifier in Systemwide Settings to Use the 'File Number' set in the case. Once setup, all members in your firm will be able to filter by this firm-assigned number via Case No. when Browsing Cases.-
Office: If you have multiple branch offices set up, you may select which branch this specific case is assigned to. Selecting the appropriate office will merge the designated branch’s address and letterhead on templates, invoices, and forms for this case.
-
Master File: If you have two or more related cases, checking this box will mark this case as the Master File. The Master File flag has no effect on other cases. It only appears in Case Info and Case File previews in order to aid in internal organization.
-
Date Entered: Date the case was entered into Merus. Filled in automatically when you create a new case.
-
Date Opened: Date the case was opened for the client. Filled in automatically when you create a new case.
-
Date Closed: Closing date for the case. Note that this date will not be filled in automatically if the case status is changed to ‘Closed.’
-
Date Referred: If this case is a referral, enter the referral date into this field.
-
Follow Up: Indicate the date that the case should be followed up on. Click on Add to Calendar or Edit & Add to Calendar in order to add the Follow Up date to the firmwide calendar. Selecting Edit & Add takes you to Calendar view so that you can view or edit this event.
- Venue: Choose the correct court venue for this case from the dropdown menu of options.
Note
Firm Administrators can edit the Default Venue for the firm via Firm Preferences.-
Venue is Based Upon: Select from one of the dropdown options in order to indicate how the Venue for this case was determined.
-
Side Represented: Select from one of the dropdown options in order to indicate what side you are representing. Based on what is set, Merus will then know how to properly handle case information in forms and templates.
-
Jurisdiction: Select from one of the dropdown options and choose the state jurisdiction that the case falls under.
-
Comments: This area is used to enter case-specific data and any miscellaneous information about the case. Any data entered here will be displayed in the left panel of the case, directly beneath the case name/caption.
-
Staff: Select the correct staff from the dropdown menus and enter the corresponding Hourly Rate. If no hourly rate is applied, the default rate from User’s account will be applied. Manage default billing rates on a user basis in User Management.
-
Caption: Merus automatically generates the case caption based on all primary contacts and defendants. You may manually update the case caption within this field if you prefer a custom case caption.
-
Bill All Time Charges to: Select the correct Bill To party for this case from the dropdown menu of available options. All party charges will be billed to this party and this party will automatically populate the Bill To section when ledger items for this case are created. Once a Bill To party has been selected, the option to Change All Historical Billing Items will be available.
-
Set Invoices to ‘Attn’ of: Select the person (e.g. employee of the carrier set as the Bill To party) to whom all invoices should be addressed to.
Note
Selecting this will change all ledger items that have not been invoiced or exported and cannot be undone. The system will prompt the user to confirm this change.-
Minimum/Maximum Invoice Amount: If a contact has restrictions on the minimum and/or maximum amount for all invoices sent to them, you can set those amounts here.
-
Billing Time Increment: Select the correct billing time increment here. Note: The billing time increment set here in the case trumps the increment set in the contact’s billing setup which in turn trumps the increment set in the firm preferences.
-
Invoiced: This field allows you to select the correct billing cycle, such as Monthly, Quarterly, or Bimonthly.
-
Invoice Delivery Method: Select from the dropdown menu to indicate how the invoices for this case will be delivered.
-
Predefined Billing Descriptions: Choose the correct billing descriptions from the available options in the dropdown menu.
-
Show All Options: Selecting this option will show both UTBMS and non-UTBMS codes when creating ledger entries.
-
Show Only UTBMS-Based Options: The Uniform Task-Based Management System is a budgeting and billing system. Selecting this option restricts the billable options to a set of codes. The codes can be updated in Systemwide Settings.
-
Show Only Custom, Non-UTBMS Codes: Selecting this option will not show any of the UTBMS codes when creating ledger items.
-
-
Ledes Data Sources: Customize how MerusCase exports Ledes Data for this case by choosing options from the dropdown menus.
Marking Cases Reviewed
Next to the Edit button in the top-right of Case Info, there is a Review Case button. If you are assigned to a case (in the Staff subsection of Case Info), you can click Review Case to create an activity in the case noting that you reviewed it.
This will keep the case from appearing on your dashboard as a stale case or case needing to be reviewed.
Related Cases
Related Cases allow the user to connect or link related multiple cases together. Once two or more cases are linked, their respective Case Details pages contain a clickable link to any other linked cases, and the option to link certain activities so that they’re visible in any of the linked cases becomes available.
Linking a Related Case
-
Click on the Link to Case button. If this case is already linked to another case, the button will instead read Link to Another Case.
-
When prompted, search for the desired case (based on the system’s case caption) and click Link.
-
Once clicked, a popup will appear prompting the user to confirm this action. Confirm by clicking Link Cases.
Unlinking Related Cases
To remove related cases, click Unlink Related. Upon clicking, all related cases will be removed and a confirmation message will displayed at the top of the page stating “Link to other case files has been removed.”
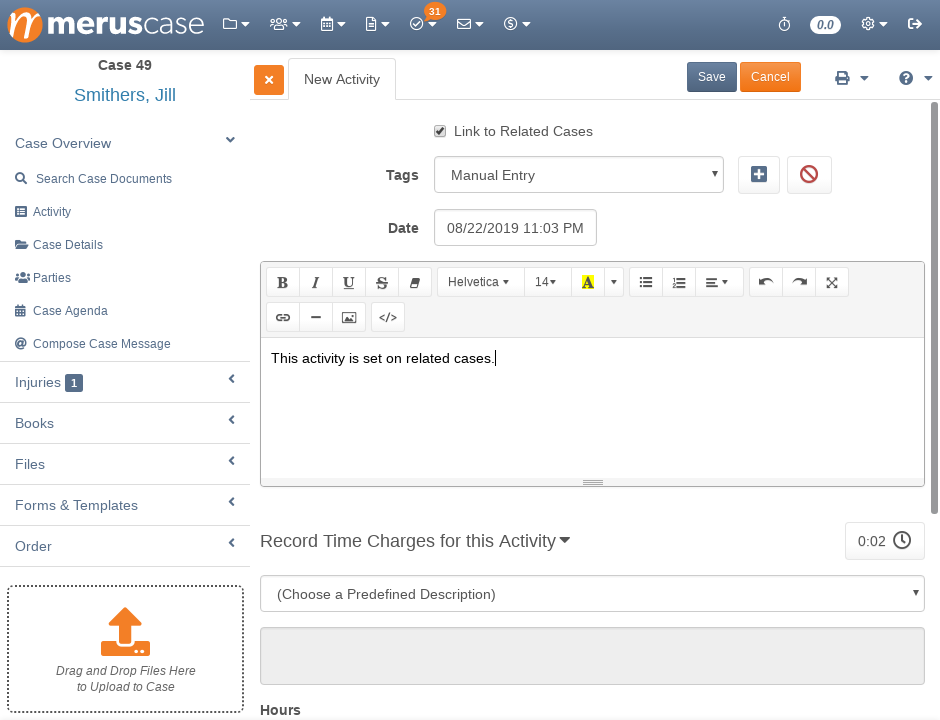
Linking and Unlinking Activities
When adding a new activity or editing an existing one, simply check the Link to Related Cases checkbox to have the activity display in any other linked case’s Activity tab. Note that this checkbox only appears if you’ve linked the case in which you’re creating it.
To unlink an activity, click the Remove Link button in the same place where the checkbox used to be.