Invoices
The Invoices Tab in the Books section, provides Power Users with Accounting and Firm Administrators the ability to create new invoices, view open invoices, apply payments or discounts, and more.
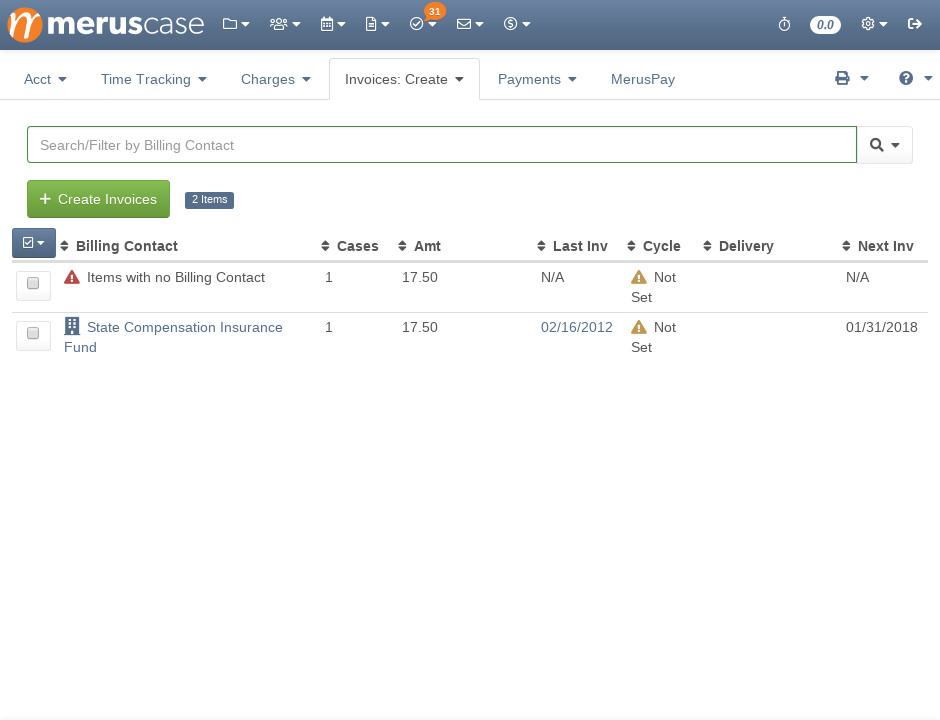
Invoices: Create
Billing Contacts with ledger items ready to be invoiced will appear as line items in the Invoice: Create tab.
Filtering Invoices: Create
Any table in MerusCase allows for filtering across any of the columns on your screen to provide the user a tailored list within the system. In other words, use the filter to quickly find a specific line item within the table.
Additionally, MerusCase supports the use of multiple filters at once. For instance, a user can search for all open (by the Case Status column) cases within Browse Cases and then apply a second filter to then search for Assigned to Me (by the Staff column) within those open cases.
To apply multiple filters, enter the first filter then click on the magnifying glass. On click, a drop-down window will appear. Click Add Filter and toggle what to filter by.
Select Always use this column if you wish to always use the same filter type. Many firms find it particularly useful to select this option when filtering for cases, forms, or templates.
Pro-Tip
MerusCase filtering has very powerful Search and Filter Tricks available to you, such as Custom Filter Shortcuts, powerful keywords, Preset Filters and even more!To remove a filter, click on the added filter button (each applied filter appears as a button underneath the Search/Filter bar). For example, to remove the filter for open cases, click on the button Status: Open underneath the Search/Filter bar.
If you have several entries to sift through, you can utilize the filter to Search by Billing Contact, Last Invoice Date, Invoice Cycle, Invoice Delivery Method, or Total Amount.
Creating Invoices
Create single or multiple invoices with the following steps:
-
Select the checkbox next to the Billing Contact(s) you would like to create invoices for.
-
Click the button labeled Create Invoices.
-
On click, a popup will appear prompting the user to set a date range via Start Ledger Date and End Ledger Date.
-
Select the appropriate date range and click Create. Alternatively, click Cancel if you no longer wish to create this invoice.
-
On click, the system will create the invoices and that Billing Contact will no longer appear in the Invoice: Create tab.
Alternatively, click on the row of the Billing Contact you’d like to create an invoice for. On click, on a widescreen monitor, the right panel will appear displaying the Billing: Cases view. On a smaller screen size, this view will take up the entire screen. From this view, the same steps (selecting the checkbox and clicking Create Invoices) apply. See documentation on Billing: Cases for more details.
What if the checkbox is disabled?
If the checkbox you are trying to select is greyed out and not clickable, this is because MerusCase is performing a check on the date of the last invoice on the case. If you click through on the date listed, you'll see the most recent invoice for this case. MerusCase disables the option to create a new invoice for a case if the next invoice date (last invoice + the time duration indicated by the "invoice cycle" setting, which defaults to one month) is in the future.For example, given a billing contact with two linked cases, and one is billed quarterly while the other is billed monthly, on Feb 1, we’ll “enable” the monthly bill and disable the quarterly one (assuming calendar months and quarters here). The Enable All button is present in case you want to override the behavior – if, say, the quarterly billed case settled, so there’s no point in delaying the invoice.
MerusCase will also disable the row if there is nothing to bill for. That will cause an error (we tell you nicely, but refuse to create an invoice with no line items) if you force it through.
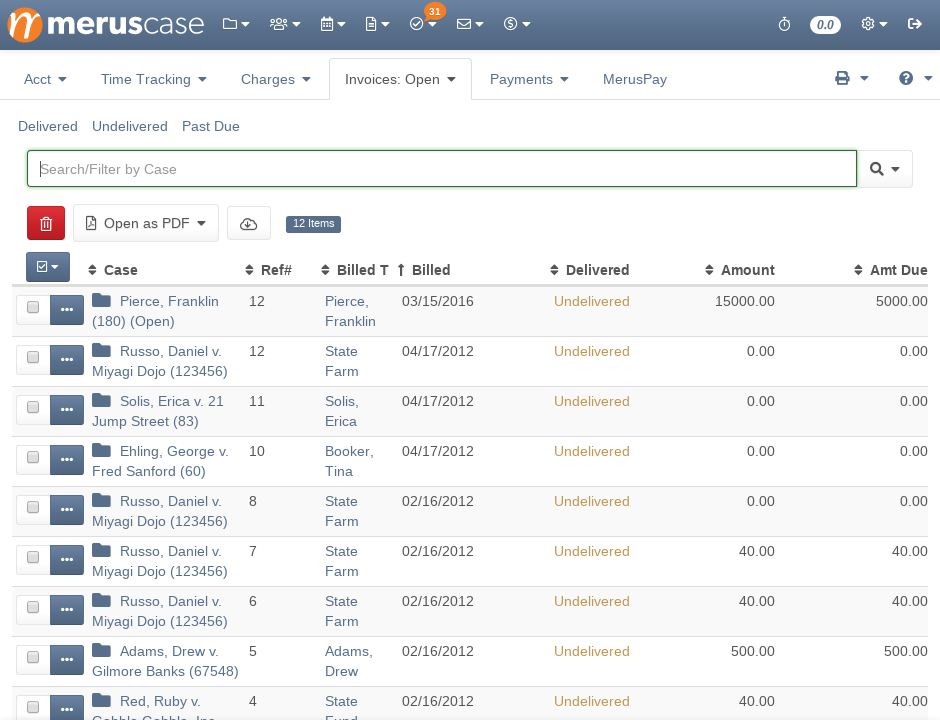
Invoices: Open
Invoices that have been created, but have not been paid in full will be displayed in the Open Invoices tab. View invoice details, apply payments, delete incorrect invoices, and more all from this interface.
Select Everything or Nothing
To make it easy to perform tasks in bulk, MerusCase has a dropdown menu available which allows the user to select all of the items in the table or deselect all of the items in the table simultaneously. Simply click the checkbox-like icon above the column of checkboxes to see the options Select None and Select Everything.
Note that this will only apply to items in the table which you’ve currently filtered for (i.e. which are displayed on your screen at this moment).
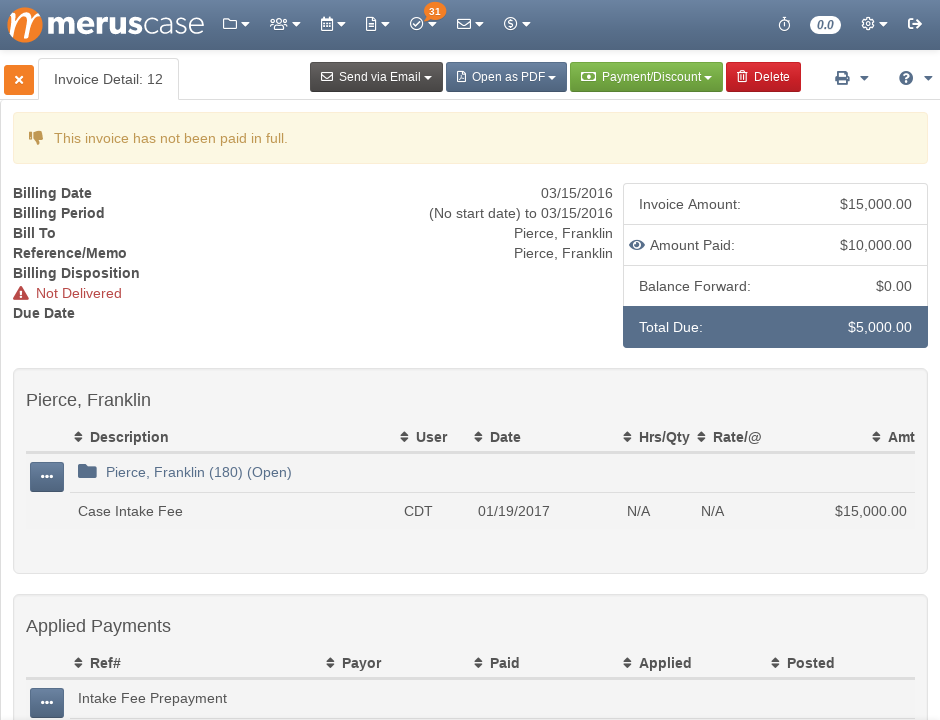
Viewing Invoice Details
To view the details of an invoice, click on the row of the desired invoice. On click, on a widescreen monitor, the Invoice Detail will appear in the right-hand panel. For smaller screen sizes, the invoice detail will take over the entire screen.
Editing Invoice Details
From Invoice Details, click on Edit to make changes to Billing Date, Billing Period Start/End, Reference/Memo, Electronic Billing Tag, Delivery Method, Tracking Number, Confirmation Number, and Delivery Date.
Once edits have been made, click Save. If no changes were made, click Cancel.
Note
Edits cannot be made to invoices once a payment, even a partial payment, has been applied.Detaching Charges from an Invoice
To detach a charge from an invoice, click on the control column and select Detach from Invoice.
Note
The option to detach a charge will be disabled once the invoice has been delivered and/or when a payment has been applied.Sending an Invoice via Email
To send a PDF version of an invoice, select Send via Email and choose either “Including Past Due” or “Only Current”, depending on whether you want to include the information from previous invoices with the current invoice. Upon selection, the Compose Message interface will appear. The email address of the invoice’s billing contact, if available, will be pre-populated into the recipient field of the email. The message will also automatically be assigned to the appropriate case file as well. If the invoice has not already been marked as delivered, you will be able to do so when composing the message by selecting the corresponding check-box.
Applying a Payment
To apply a payment to an invoice, click on the Payment/Discount button and select New Payment. On click, a dropdown menu will appear at the top of Invoice Details prompting you to select the Payment Method.
See documentation on creating payment methods for more information on what options are available in the Payment Method dropdown menu.
The payment selected will display an interface to either Record New Payment or Create a Payment Request.
Record New Payment
Selecting cash, check, or credit card will display Record New Payment. Enter information prompted and click Save to fully record and apply that payment.
Once complete, the recorded payment will be displayed in Applied Payments.
Click on the control column to Edit/Reconcile the payment which will redirect the user to Payment Details where you can then unlink the payment from the invoice, delete the payment, and more.
Additionally, the option to Apply to Ledger Entries is also available in the control column which allows the user to apply the payment to specific ledger entries included on the invoice.
Applying a Discount
To apply a discount to an invoice, click on the Payment/Discount button and select New Discount. On click, a popup will appear displaying the Original Amount, Adjustment Type, Discount Amount, Remaining Amount, and Memo. The Original Amount and Remaining Amount cannot be edited. The Remaining Amount will be automatically adjusted based on the inputted information.
Once a Discount Amount has been entered, the Discount button will be clickable. Select Discount once all necessary fields are complete. Click Cancel if you wish to no longer apply this discount.
Once a discount has been applied, the discount will appear on the Invoice Detail under Applied Discounts.
To Remove an Applied Discount, select the control column to the left of the discount and select Delete. On click, a popup will appear asking for confirmation.
Viewing as a PDF
-
Select the checkbox to the left of the invoice that you would like to view as a PDF.
-
Click the button labeled Open as PDF.
-
If you are using Chrome as your web browser, on click, a new tab will open containing the selected invoice(s) in PDF format. For other browsers, the PDF will download to your local device.
Deleting Invoices
To delete, click on the checkbox(es) next to the desired line item(s) and select Delete.
Alternatively, you can delete an invoice from within Invoice Details by clicking on Delete in the upper-right corner of the screen.
Exporting Invoices
-
Select the checkbox to the left of the invoice(s) you would like to export.
-
Click the button labeled Export Invoices
-
On click, a popup will appear with a dropdown menu prompting you to Select an Export Format.
-
Once the desired format has been selected, click on Export to export the invoice(s). Alternatively, click on Cancel to close the popup without exporting.
-
After clicking on Export the invoices will be delivered to your inbox once they have been processed by the system.
Note
Exporting to LEDES? Refer to our article entitled Invoice Export Tips: LEDES98b for better understanding of the exported file.Invoices: Paid
Invoices that have been paid in full will be displayed in the Paid Invoices tab. View invoice details, applied payments, and more with the same steps outlined in Invoices: Open above.